Tuesday, July 17, 2012

Desk and vanity Stool

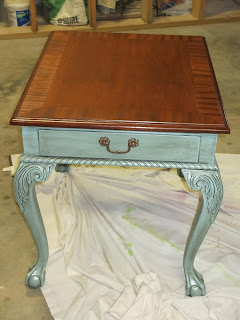
These two pieces might be some of the best before and after pics yet!  I got this desk out of an old abandoned house.  It had been sitting untouched for about 20 years.  The vanity stool came from the Salvation Army Store. 
You wouldn't know it by looking at the pics now!  Here are the before!
Pretty rough huh? 
At first glance I admit, I thought it might be a lost cause.  I started with the vanity stool.  As you can see, it had an awful fabric and some awful paint.  I took the seat off and used some fabric that I already had, and my staple gun and recoved the stool. 
Looking better!  I had never used stripes before, so I had to be a little more careful to keep them in line and not stretch the fabric too far.  Once that was complete I decided I didn't want to spend a lot of time sanding.  There were several layers of paint on this stool!  So I used one of my favorite products!  Deglosser!
This liquid sandpaper allows you to take off the shiny finish with no sanding.  Just follow the manufactures instructions.  I decided not to prime.  The deglosser had left it pretty sticky so I did not think it would  be necessary.  I painted it a nice off white and let it dry.  It took two coats to cover the green! 
Next I distressed using my ryobi sander that my wonderful husband bought me!  I have literally gone through 3 sanders since I started this venture! I wanted it pretty chippy.  because it had so many layers of paint, I was able to distress at different depths for different color tones. 
great little tool!  Really does the trick!
Next i used some stain.  I think it was dark walnut.  Anything you have on hand will work.  I usually use a q-tip or small brush and only stain the sanded areas, but because I want to distress this alot, I rubbed those areas first and then came back with a soft cloth and rubbed it all over.  It creates the look of glaze, a little more distressed. 
Put the seat back on and Tada! 
Now the Desk.....  The laminate on the top was in really bad shape.  It had alot of water damage. 
So I had to remove it.  I was left with a pretty rough finish.  I decided to sand it lightly, but just leave it pretty rough.  I had painted a buffet for my daughter's wedding, and it turned out really good, so I decided to use the same colors.  I really pretty green, with a black glaze for the drawers, and a cream color for the body of the desk.  The desk was covered in a really thick coat of some kind of poly or something.  I sanded the drawers pretty much to the wood and then primed them. 

The red mahogany kind of bled through, but I thought it looked pretty good, so I only primed on coat. 
Then I painted the drawers green.  Two coats, drying in between.  (hardest part)
Then used my sander again to sand the edges.
I like to sand a little extra where the handles would naturally be worn. 
I took some stain and carefully rubbed the sanded areas to age.  I decided to use the original hardware, because it had kind of a vintage look, and the green was just right. 
I painted the rest of the desk a cream color, then glazed it. 
I used Mahogany red stain on the top til I liked the color. 


Love!


Saturday, June 2, 2012

Display Cabinet

My latest project.
I was in need of a display cabinet for the booth.  I had several pieces of furniture in the basement, that I thought might work.  Below is the finished product first.  It turned out so great!  Lots of room for all my plates and glass.  It is lighted too, so that was a bonus!
I have to admit, I have never painted any furniture with this kind of finish before.... It is sort of laminate over particle board? I guess?  The finish is shiny and slick.  I wasnt sure paint was even going to stick at all. 
I hate to use the word ugly, but this thing was really ugly!  It had really brass gaudy hardware, a very fake looking finish.  The doors were beyond ugly and really heavy.  They actually made the piece feel heavy to the front, like it might even tip over!  So I decided to take all the doors off.  I took all the glass out, and pretty much just stripped it clean.  I wasnt sure if my usual liquid sanpaper would work, but I decided to use everything I had to try to prepare the surface to paint. 

After cleaning with TPS and then the deglosser it still felt completely slippery!
This is Most of the time when you use the liquid sandpaper, it breaks down the finish and allows paint to stick.  It will feel very sticky.  Sounds crazy, but its exactly what you need to happen.  Well.....not this time. Sooooo I decided to use the best primer I had and see what happens.
This is really good stuff.  I try to use older brushes because I think it tends to dry out and make mine still no matter how much I wash them.  It cleans up with water, and goes on thick!
Looks rough huh?  I was a little nervous, but I waited a couple of hours for it to dry.  I had two colors of paint I wanted to use.  One was a light tan and one a little lighter, almost ecru.  We painted all the trim on the top and around the edges with the darker color, and used the lighter color for the inside and the "body" of the cabinet.  I let that dry.  My helpful husband said.  AI think we should make it look a little weathered.  You know?  We took some of both colors and just kind of sparingly spread them on in a random way.  It went really fast!  I think using the two colors in two different layers had a really nice effect.  I was really dry as soon as we finished. 

Looking a little better, but still not distressed enough.  We both grabbed a sanding block and started distressing the edges.  the more distressed the better, in my opinion. 
I use a mouse sander too.  Goes much faster! 
Anytime I distress, I usually follow up with a q-tip and some stain.  Only on the sanded areas.  Put it on really light and wipe it off immediately.  I go into great detail on some of my other blogs.  I also  used some copper rub and buff on the brass wheat thing that I had completly painted over. 
This is an old photo of some hardware.  You just wipe over the area with your finger.  Turns out great!  I used "copper"

We finished up with a coat of polycrylic,  and Tada!  New display!

Sunday, May 13, 2012

Ethan Allen Table Makeover....

After!

This color seems to be everybody's favorite.  Everything I have done using this combination of paint and antique glaze sells really quickly! 
The table was in good shape to start with.  Just some scratches on the top.  The top has a thin laminate over wood.  I have found that if you are really careful, you can sand the topcoat off the laminate and get rid of most, if not all, the scratches.  You do have to be very careful  because you can sand right through the laminate if you are not careful. 
After sanding down the top i picked out a pretty color of stain,  This one is a little red, which matched the table perfectely.  TIP,,,Dont sand the edges of the top!  It is just too hard to get around all the edges.  If they are in pretty good shape, you can stain to match the top.
While that is drying, I used a liquid sanpapaper and cleaned all the bottom of the table.  Everything you are planning to paint.  This will leave you a sort of sticky feel that the paint will adhere to. 
It dries fast, and really saves tons of time and work!  After that I used a primer.  I dont always prime everything, but if you are going to really be using the table and it is a really nice piece of furniture I would prime.  Especially with this newer furniture.  The finish can be really hard.  The last thing you want is to spend all your time painting and it just chip off... very bad. 
This is really good stuff!  Let it dry!  Probably best to wait overnight..  Then pick your paint,  I use an eggshell finish.  I got this fabulous color at Lowes.  I will have to get  back to you on the color... I didnt write it down..One great thing Lowes will do for you, is keep up with all your paint colors for you.  You get a card that they scan when you check out, and next time you go back, they can look up all your purchases.  Really nice! 
I used 2 coats.  Let that really dry.  If you don't, the paint will soak up way too much of the glaze and be too dark...
Get some glaze....
I brushed it on.  I wanted to get in all the detailing on the table.  You can work with it for a few minutes, so take your time.   I did one section at a time so it wouldnt dry our too fast.. Like one leg at a time.  Take a clean dry cloth and wipe the glaze off.  This is personal preference.  Take as much or a little as you like.   You cant really mess up, unless you start going back and re wipe places that are dry.  You can spritz with a little water, and wipe again if you wait too long. 
After it dries, Paint the whole table with a coat of polycrylic.  You might want to put two coats on the top.  Let dry completely in between! 


Love!

Saturday, May 5, 2012

Coffee Table

Great Project!  When I got it at a yard sale it was a little banged up!  It had milked spilled on it, lots of marks on the top from toys and blocks, one wheel missing and a drawer out of whack.  I could tell it was a diamond in the rough! 
Here's a before pic.  I let it sit im my basement awhile, contemplating what to do.....
I fianally decided, with the help of my husband, to sand the top and paint the rest. 
We really liked the way our buffett had turned out with two different colors of paint, so we decided to go that route again.  We knew we were going to have to sand the top all the way down to get to a nice even surface.  So, in the deal I got a new belt sander! Yay!
Here is a pic from the side.  We wrapped the color all the way around.  It really turned out nice.  My husband fixed the wheel and waxed all the drawers and lined everything up and tightened all the rails the drawers glide on.  We put about 3 coats of polycrylic on top and one coat on everything else. 


Saturday, April 14, 2012

Vanity Stool

Vanity Stool

Really nice re-do!  this vanity stool was in pretty good shape.  I don't have a before picture:(
Let's just say the wood was in pretty good shape.  The fabric was rotten and ugly!  I found this really nice fabric at Hobby Lobby.  It was a little expensive, but it only took about half a yard.  I bought some new foam, and cut it to fit.  Used a staple gun to secure everything.  I did sand the rough edges.  The prevoius owners covered alot of their furniture in some really thick awful sealer of stain of some kind.  It was almost like sanding paint.  Once I got it smooth I decided to distress the edges a little and restain the whole thing.  Used polycrylic to seal it all after it dried.  Lovely!

Saturday, April 7, 2012

Bedroom Suite

I know I say all my projects are my favorite, but this one really has been one of best ever!
This furniture really did seem like a lost cause!  I was in a really old abandoned house.  The bed was actually in an old store.  
This is how I found it!
pretty rough!  I had to pull off alot of vaneer and do some sanding! 

The drawers were a little sticky on both the vanity and the chest, but the vaneer was in really good shape.  So we decided to clean it up and use some poly, and they turned out really nice!
so our color combination was born. 

Took lots of time! but worth the effort! <3


Thursday, March 29, 2012

Garden Chairs...

Fun Garden Chairs!


I found two old chairs that had been stored in an empty building for more that 20 years.  They were in pretty bad shape.  I removed all the webbing and painted and distressed!
I used some stencils and scrapbook paper for the lettering.  The baskets complete eith chains came from wal-mart.  They were easy to attach and hang where the seats were! Add some nice flowers and your done!


Sunday, March 18, 2012

Pretty Picture Frames

Pretty Picture Frames
I have seen these all over Pinterest! Loved them, but had a little trouble finding the frames.  I think they have become so popular, everyone is grabbing them up! 


The before pics kind of tell the story.... Very old, very dirty.


No, you are not seeing double!  I have two!  I cleaned thep up with TSP, and put on a coat of my favorite color paint!

I used a brush an put the glaze on one side at a time.  Pretty thick so I could get in the cracks. 
Take a soft cloth an wipe off the excess. 


When your finished, and its all dry, either use some polycrylic or some sort of spray sealer.
Really easy and looks great! Good Luck finding your frames!